| Refraction Rendering |
The Samples contain a RefractionSample, which demonstrates a few interesting aspects:
- How to extend the default MeshRenderer class.
- How to create a refraction effect.
- How to create a chromatic dispersion effect.
- How to create fake reflections.
This article provides additional background information and explanations.
This topic contains the following sections:
The Dude models in the RefractionSample are rendered using a custom effect. Here is one of the materials (*.drmat file):
<?xml version="1.0" encoding="utf-8"?>
<Material>
  <Pass Name="AlphaBlend" Effect="Refraction.fx" Profile="HiDef">
    <Parameter Name="Tint" Value="0.7,0.7,0.9" />
    <Parameter Name="RefractionIndices" Value="0.4,0.6,0.8" />
    <Parameter Name="RefractionStrength" Value="0.04" />
    <Parameter Name="FresnelParameters" Value="0,1,3" />
    <Parameter Name="Alpha" Value="1" />
    <Parameter Name="BlendMode" Value="1" />
    <Texture Name="NormalTexture" Format="Normal" File="upBodyN.tga" />
  </Pass>
</Material>
The render pass is called "AlphaBlend". This is the name that the deferred lighting graphics screen uses for forward rendered, transparent objects. The effect is Refraction.fx, which is a custom effect included in the sample.
To create the refraction effect, the Refraction.fx shader needs to sample a texture which contains the current scene. Such a texture is usually not available. Therefore, the sample implements a new mesh renderer class derived from the default MeshRenderer. Before the new renderer draws a mesh, it checks whether the mesh has an effect parameter with the semantic SourceTexture. If so, the renderer gets the current render target and stores it in the SourceTexture property of the RenderContext. Since, a shader cannot read from and write to the same render target, the renderer sets a new output render target. The source texture and depth buffer content is copied to the new render target, and then the mesh is rendered.
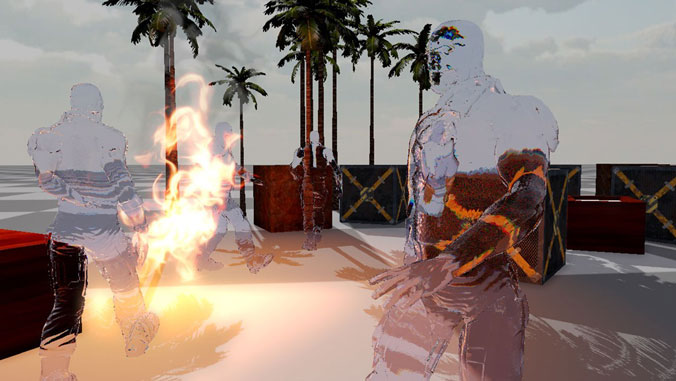
Using this approach, every refracting mesh can sample an up-to-date version of the back buffer. A refracting mesh can even refract another refracting mesh. (When you look closely at the screenshot above, you can see that there is actually another Dude behind the right Dude.)
Resolving the current scene and copying it to a new render target is costly. To improve performance, we could get the source texture only once, before all transparent meshes are rendered. This is faster, but would prevent multiple refractions.
When the refraction shader renders a pixel, it samples the source texture containing the current scene. Instead of sampling the texel that is directly behind the model, it uses the surface normal to refract the view ray and offsets the sample position.
For a more realistic effect we would have to:
- Refract the view ray at the front faces of the model. (Entry point)
- Follow the ray and refract it a second time at the back faces of the model. (Exit point) (Note: A concave mesh can have multiple entry and exit points!)
- Calculate the exact intersection of the ray with the background geometry.
However, "fake" refractions using a simple displacement usually work fine in games. More realistic solutions are often too expensive.
Known issues
Concave models, such as the Dude model, can cause problems. Take a look at the left character in the screenshot: The left arm should be occluded by the torso, but it appears to be in front. This happens because the triangles are rendered in arbitrary order without depth sorting. There are a few ways to deal with this problem:
- Ignore it. – A popular strategy for computer graphics in games. ;-)
- Implement order-independent transparency [1].
- Reduce the alpha value of the model. - This make the error less noticeable. However, this will also make the normal non-refracted background shine through.
In the screenshot, you can see a rainbow coloring of some of the refracted background. This occurs in reality because the refraction index depends on the wavelength. In other words: Different colors (wavelengths) of the light are refracted differently.
This effect is easy to achieve. You only need to sample 3 different positions in the source texture. Take the red value of one sample, the green value of the other sample and the blue value of the third sample. The Refraction.fx effect uses different refraction indices for red, green and blue to control the sample positions. The differences of the refraction indices are exaggerated to make the effect more pronounced.
The last component of the effect are reflections. For example, the fire on the left is reflected in the Dude on the right. This effect is very simple: We compute the reflection vector and make a texture lookup in the source texture using a sphere mapping. – This is obviously not physically correct, but it creates an interesting effect.
A Fresnel term is used to lerp between reflections and refractions. Reflections are important if we want to give the material a glass like quality.
- [1] Order-independent transparency. Wikipedia, http://en.wikipedia.org/wiki/Order-independent_transparency
- [2] Dispersion (optics). Wikipedia, http://en.wikipedia.org/wiki/Dispersion_(optics)