| Character Controller Implementation |
This topic contains the following sections:
DigitalRune Physics provides two character controller implementations: KinematicCharacterController and DynamicCharacterController.
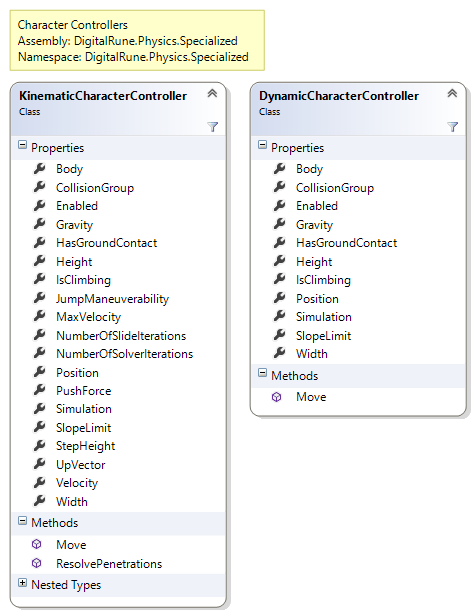
The kinematic is more expensive and more advanced implementation. It is modeled as a RigidBody, but the movement (including sliding, stepping, etc.) is computed outside the physics simulation using only the collision detection. A kinematic character controller is more complex but allows to tune all aspects of the character movement.
The dynamic character controller is a faster and simpler implementation. It is called "dynamic" because the character is modeled as a RigidBody where velocities are set. The physics simulation automatically computes the character movement.
For a discussion about the advantages and disadvantages of the different character controller types, have a look at: Kinematic vs. Dynamic Character Controllers [1]
This section describes some implementation details of the character controller:
Capsule shape: The character is modeled using an upright, capsule-shaped rigid body. The rotations of the capsule are locked (see e.g. LockRotationX). The rigid body is added to the physics simulation. However, the movement is still computed by slide methods in the character controller. A capsule shape has the advantage that the lower spherical cap smooths up/down movement when it moves over small obstacles or over stairs. Still, an additional smoothing is desirable in many cases (which is not supported in our character controller example).
Slide: The basic routine in our character controller is called a slide. It takes a desired position and computes a valid, non-penetrating position near the desired position like this:
The capsule is set to the desired positions and we detect all intersections. The collision detection returns all contacts at the desired position, including contact positions, contact normal vectors and penetration depths. Each contact indicates that we have moved into a solid object - we have reached a limit of the allowed movement space.
For each contact found we store a bounding plane that represents that movement limit. If the capsule touches a wall, the bounding plane is parallel to the wall surface. If the capsule touches an object like a sphere, the bounding plane is parallel to the tangential plane at the contact point. All bounding planes together limit the allowed space in which the capsule can move.
Now, that we have a description of the allowed space in which the character can move, we compute the allowed position closest to the desired position. We do this by a simple iterative process: If we have no bounding planes or the desired position is in front of all bounding planes, we are done. If the desired position is behind a bounding plane, we project the position onto the surface of the bounding plane. The new position is checked against the next plane. If it is behind the plane it is projected onto the surface. The new position is checked against the other planes, and so forth. This is done in a loop until we have found an allowed position in front of all bounding planes.
Once, we have found the new position, we set the capsule to the new position and detect all intersections. It is possible that we find new bounding planes that we add to the set of existing bounding planes. We repeat the process above until we have a new position that does not violate any bounding plane.
 Note
NoteThe above problem is very similar to Linear Programming. The bounding planes describe the convex polytope of the feasible space and our objective is to find an allowed position near the desired position.
Step up: The step up operation temporarily changes the current capsule position: The step height is added and the capsule is moved forward by an amount proportional to the capsule size. If there are forbidden contacts at this position, the temporary position changes are undone. If there are no forbidden contacts, the up-stepping was successful: The new capsule position is the old capsule position plus the step height.
Step down: Down stepping is like a slide to the current position minus the step height - but the movement is only committed if the movement stops at a position with a bottom contact. If the capsule does not find a ground contact within the step height, then the step down operation does nothing because the character is simply falling.
Move: KinematicCharacterControllerMove is the public method that is called each frame. It combines all previous methods like this: First, we slide to the first obstacle. At this new position we try to step up. If the this is not successful we finish the slide to the desired position. At the end we try to step down And done.
Jump maneuverability: The controller allows to limit movement changes when the character does not touch the ground. This is done by linearly interpolating the last movement with the desired movement. In pseudo code:
desiredMovement = Lerp(lastMovement, desiredMovement, JumpManeuverability);
If JumpManeuverability is 0, the character continues the motion of the last frame. If JumpManeuverability is 1, the character can instantly change directions.
Pushing objects: When the character stands on an object, its weight pushes the supporting object. This is achieved by applying a downwards-directed impulse to the object. To push objects horizontally, the character controller applies an impulse that depends on its current speed.
Moving with moving platforms: To move with platforms (e.g. elevators, conveyors), the character checks its ground contacts and computes the average velocity of all ground contact points. This velocity is applied to the capsule body and the physics simulation will move the body.
No continuous collision detection (CCD): The collision tests do not use continuous collision detection. That means, if the character moves a huge distance in one step, collision can be missed. For characters with normal speeds, this is not a problem. However, if a character should be moved with an very large speed, it might be better to divide the move into several smaller moves.
The DynamicCharacterController is much simpler than the KinematicCharacterController. The goal of this implementation is to show how easy it is to create a basic character controller using a physics engine. It is also very fast because the movement is computed by the physics simulation and it lacks the elaborate tests of the KinematicCharacterController.
The character is modeled as an upright, capsule-shaped rigid body. To move the character we simply set the velocity of the rigid body and let the physics simulation do the rest.
A short ray is attached to the rigid body to sample the ground below the capsule. This is necessary to detect forbidden slopes. Further, we make sure that the walking velocity is always parallel to the ground. For example, when walking down an inclined plane, the walk velocity must be parallel to the plane. If we would simply set a horizontal velocity, the capsule would step into empty space and fall down in the next frames.
Since the capsule’s bottom is round, it can automatically slide over small obstacles and steps. But it cannot smoothly pass high steps. Compared to the KinematicCharacterController, the DynamicCharacterController is fast and simple. But it has several disadvantages:
- Limited control because the movement is done in the physics simulation.
- Instabilities when running into slope limits.
- Limited stepping abilities.
- No support for moving platforms.
- No limitation of jump maneuverability.
- Etc.
Some of these restrictions are not inherent problems of a dynamic character controller. They are there to keep the code simple. The source code is available for licensees and can be extend, e.g. by adding features from the more advanced kinematic character controller.
The CharacterControllerSample (see Samples) shows how to use the character controllers to let a player move, including: jumping, climbing, pushing objects, crawling, hanging on ledges, stepping over obstacles and slopes, etc.
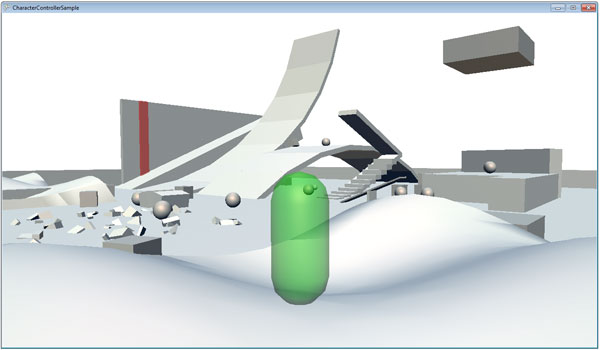
Here is a video of the sample:
The sample shows how add several advanced character controller features:
Dynamic Jump Height: The jump height depends on the duration over which the jump button is pressed. The player can hold the button longer to increase the jump height. The hold time can be limited (e.g. to 10 frames) to limit the maximal jump height.
Crouch: To support ducking/crouching, simply change the height of the capsule. Before standing up, check if there is enough space for the full-size capsule. If the full-size capsule would collide with another object, the character remains crouching.
Climbing: The character can climb when it touches certain trigger objects. This could be a ladder or a climbable part of the wall. When the trigger objects are touched the IsClimbing flag of the character controller is set. When the flag is set, no gravity is applied in the character controller and vertical movement is allowed.
Holding on Ledges: The character can hold onto edges of platforms. To find ledges create a collision object (e.g. a box) and check for collisions in the upper part of the capsule and in the lower part of the capsule. If the upper box does not collide and if the lower box collides with an object, then we assume to have found a ledge and set the IsClimbing flag. This is one possible solution. We could also place extra trigger volumes to mark ledges - especially if we want to restrict where the player can climb.
[1] "Kinematic vs. Dynamic Character Controllers", DigitalRune Blog, http://www.digitalrune.com/Support/Blog/tabid/719/EntryId/40/Kinematic-vs-Dynamic-Character-Controllers.aspx