| Models and Meshes |
This topic contains the following sections:
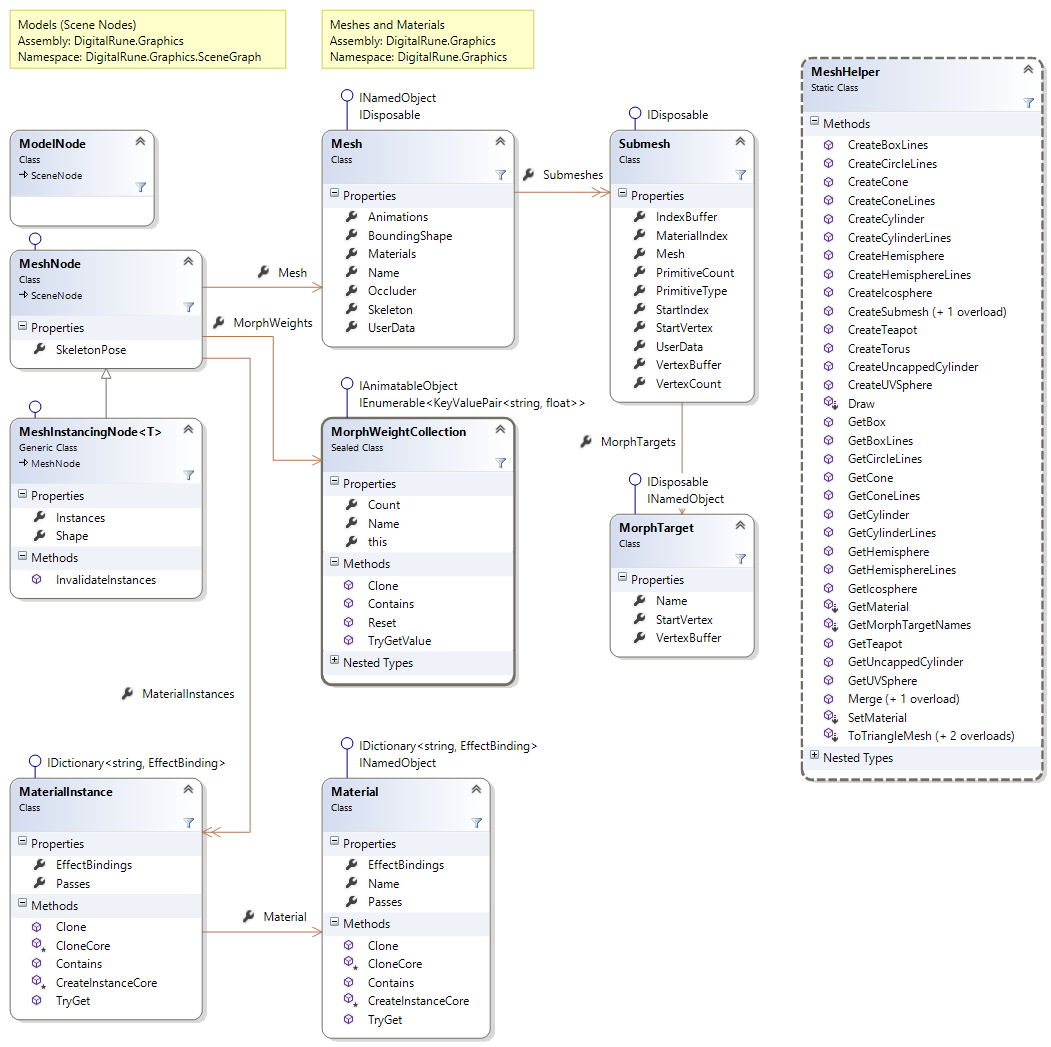
A ModelNode represents a 3D model. The ModelNode serves as a "group node", i.e. the actual data is stored in the ModelNode. The complexity of a model can vary from a single MeshNode to a complex hierarchical tree of MeshNodes, LightNodes, and other scene nodes.
Models are usually loaded from files using the XNA content pipeline: see Models.
A Mesh represents the geometry and materials of a 3D object that can be rendered. A mesh owns a collection of materials (see property Materials) and is divided into submeshes (see property Submeshes). Each Submesh describes a batch of primitives (usually indexed triangles) that use one material and can be rendered with a single draw call.
A MeshNode is used to position a mesh in a 3D scene. The mesh node defines its position and orientation. Multiple mesh nodes can reference the same mesh, hence it is possible to render the same mesh multiple times in a scene.
Bounding shapes
The bounding shape of the mesh is usually created by the content pipeline and stored in the BoundingShape property. It is not updated automatically when the vertex buffer changes. The user who changes the vertex buffer is responsible for updating or replacing the shape stored in BoundingShape. If the mesh can be deformed on the GPU (e.g. using mesh skinning), then the bounding shape must be large enough to contain all possible deformations.
The properties of the bounding shape can be changed at any time. But it is not allowed to replace the whole bounding shape while the mesh is in use, i.e. referenced by a scene node. For example, if the bounding shape is a SphereShape, the radius of the sphere can be changed at any time. But it is not allowed to replace the SphereShape with a BoxShape as long as the mesh is used in a scene. Replacing the bounding shape will not raise any exceptions, but the mesh may no longer be culled/rendered correctly.
Materials
A mesh can have one or more materials. A material (class Material) defines how a submesh should be rendered. Materials can be shared between different meshes.
When a mesh node is created, a material instance (class MaterialInstance) is created for each material of the mesh. The material instance stores the effect parameters that are specific to a certain mesh instance.
See Materials and Material Instances for more information.
Morph target animation
Meshes support morph target animation. See Morph Targets for more information.
Skeletal animation ("mesh skinning")
A mesh can have a skeleton (see property Skeleton), which can be used to animate (deform) the mesh. The skeletal animations are automatically loaded together with the mesh and stored in the property Animations. DigitalRune Animation can be used to play animations and apply them to the SkeletonPose of a specific MeshNode.
The animations stored in MeshAnimations are usually of type SkeletonKeyFrameAnimation. When played back, a SkeletonKeyFrameAnimation runs once and then stops. To create a looping animation, the animation needs to be wrapped with an AnimationClipT or a TimelineClip.
// Start animation.
var animationService = _services.GetInstance<IAnimationService>();
var animationClip = new AnimationClip<SkeletonPose>(meshNode.Mesh.Animations["Walk"])
{
  LoopBehavior = LoopBehavior.Cycle,  // Repeat animation...
  Duration = TimeSpan.MaxValue,       // ...forever.
};

var animationController = animationService.StartAnimation(animationClip, (IAnimatableProperty)meshNode.SkeletonPose);
See 3D Character Animation for more information.
Primitives
The MeshHelper provides methods to create geometric primitives, such as boxes, spheres, cylinders, cones, etc.
This section explains how to render meshes using the MeshRenderer.
MeshRenderer
The MeshRenderer is a SceneNodeRenderer that handles MeshNodes. It can render a large number of meshes very efficiently: The renderer sorts meshes by material to reduce the number of render state changes. Multiple instances of the same mesh are rendered with a single draw call using geometry instancing.
It may be necessary to render a mesh multiple times per frame with different setting. These are called "render passes". For example, in the "GBuffer" pass the mesh is rendered into the G-buffer, in the "ShadowMap" pass the mesh is rendered into the shadow map, in the "Material" the mesh is rendered into the back buffer, etc. Each render pass requires different settings: parameters, shaders, textures. The number of render passes may differ from application to application.
DigitalRune Graphics uses the following structure to describe meshes: A MeshNode references a Mesh which defines vertex buffers, index buffers and materials. The mesh is divided into one or more Submeshes. Each submesh has a certain Material. A material is a dictionary of EffectBindings - one effect binding per render pass.
The MeshRenderer renders a single render pass: It takes a list of scene nodes, selects all mesh nodes and renders them using the selected render pass. A render pass is selected by setting the RenderPass property in the RenderContext.
// TODO: Set graphics device states here.

// Select render pass.
context.RenderPass = "Material";

// Render a list of mesh nodes.
meshRenderer.Render(meshNodes, context);
For each submesh, the mesh renderer looks up the effect binding in the material. If an effect binding for the given render pass is found, it applies the bindings (parameters, shaders, textures) and draws the submesh.
Render passes are arbitrary, user-defined strings. DigitalRune Graphics does not use a fixed set of render passes. Choosing the right render passes is up to the application. If a material does not contain an entry for a specific render pass, the mesh renderer simply ignores the submesh. - It won't be rendered in this render pass! |
Example: Opaque meshes
The following code snippets shows how to render opaque meshes.
// Optional: Set render target and viewport.
graphicsDevice.SetRenderTarget(renderTarget);
graphicsDevice.Viewport = viewport;

// Set the same values in the render context.
context.RenderTarget = renderTarget;
context.Viewport = viewport;

// Set render states.
graphicsDevice.RasterizerState = RasterizerState.CullCounterClockwise;
graphicsDevice.DepthStencilState = DepthStencilState.Default;
graphicsDevice.BlendState = BlendState.Opaque;

// Select render pass.
context.RenderPass = "Default";  // Or "Material" ... depends on application

// Render a list of scene nodes.
meshRenderer.Render(sceneNodes, context);

// Optional: If one of the meshes uses floating-point texture, it might be
// necessary to reset the texture stage. Otherwise, the subsequent code may
// throw an exception in XNA.
graphicsDevice.ResetTextures();
Example: Alpha-blended meshes
The following code snippets shows how to render alpha-blended meshes.
// Optional: Set render target and viewport.
graphicsDevice.SetRenderTarget(renderTarget);
graphicsDevice.Viewport = viewport;

// Set the same values in the render context.
context.RenderTarget = renderTarget;
context.Viewport = viewport;

// Set render states.
graphicsDevice.RasterizerState = RasterizerState.CullCounterClockwise;
graphicsDevice.DepthStencilState = DepthStencilState.DepthRead;
graphicsDevice.BlendState = BlendState.AlphaBlend;

// Select render pass.
context.RenderPass = "AlphaBlend";

// Render a list of scene nodes.
meshRenderer.Render(sceneNodes, context, RenderOrder.BackToFront);

// Optional: If one of the meshes uses floating-point texture, it might be
// necessary to reset the texture stage. Otherwise, the subsequent code may
// throw an exception in XNA.
graphicsDevice.ResetTextures();
Rendering a scene with many mesh instances can be time-consuming. Batching and hardware instancing can be used to improve performance.
Following strategies can be used to handle a scene with many mesh instances:
A) No batching:
Each instance is represented by a MeshNode. The mesh nodes use a material which does not support hardware instancing (see Guidelines for Writing Effects) and/or dynamic hardware instancing of the MeshRenderer (see property MeshRendererEnableInstancing) is disabled. The MeshRenderer renders meshes individually, which requires one draw call per instance. This method is the slowest.
B) Batching using dynamic hardware instancing:
Each instance is represented by a MeshNode. The mesh nodes use a material which supports hardware instancing (see Guidelines for Writing Effects) and dynamic hardware instancing of the MeshRenderer (see property MeshRendererEnableInstancing) is enabled. The MeshRenderer automatically renders all instances of the same mesh with a single draw call.
C) Batching using static hardware instancing:
The class MeshInstancingNodeT represents a mesh and a collection of mesh instances. A single MeshInstancingNodeT can be used instead of storing individual MeshNode. When the MeshRenderer renders a MeshInstancingNodeT, it renders all instances using only a single draw call. This is faster than strategy B because the graphics resources for hardware instancing only need to be created once (or whenever MeshInstancingNodeTInstances is modified).
D) Static batching:
The MeshHelper can be used to merge all instances of a mesh into a new mesh. This creates one big vertex buffer with the pre-transformed vertices.
Some more notes:
- Strategies C and D are the fastest. It is recommended to use D for small meshes (e.g. grass billboards) and C for large meshes (e.g. trees).
- Strategies B and C require HiDef graphics profile and cannot be used with the Reach graphics profile.
- Strategies C and D cannot be used with depth sorting (i.e., transparent objects will be blended in random order and not back-to-front).
- Strategy C does not support occluders (i.e., the mesh should not contain an occluder).
- No batching strategy can be used with skinned meshes or morphing (at the moment).
For more details have a look at the BatchingSample (see Samples).