| Level of Detail (LOD) |
Level of Detail (LOD) can be used to improve the render performance of distant objects.
This topic contains the following sections:
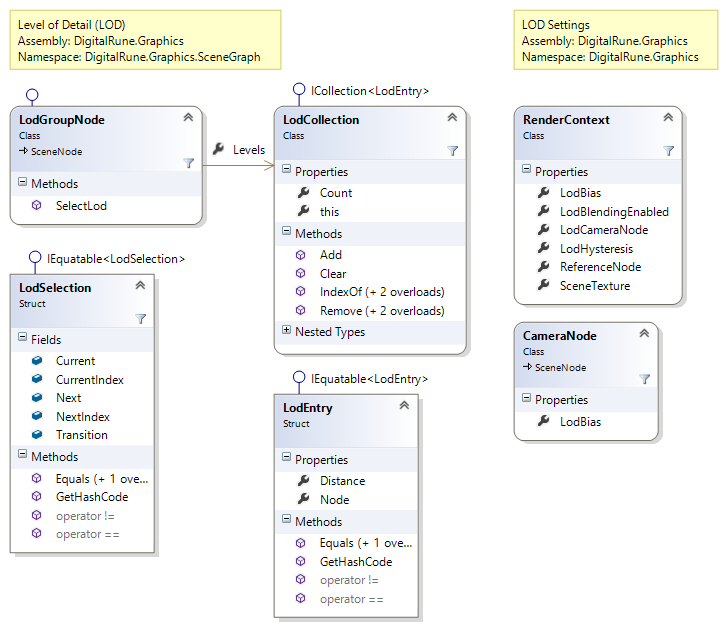
The LodGroupNode represents an objects with multiple levels of detail (LODs). It stores a collection of LODs (see property Levels). A LOD is defined by its LOD distance and a LOD node:
Distance: The LOD distance is the threshold distance at which the engine switches to this LOD. All distances are "view-normalized" distances. This means that distance values are corrected based on the camera's field of view. The resulting LOD distances are independent of the current field of view. See GraphicsHelperGetViewNormalizedDistance for more information.
Node: The LOD node is a scene node that represents this LOD. In most cases this is a single node (typically a MeshNode), but it can also be a tree of scene nodes. LodGroupNodes can even be nested, i.e. a LOD node may contain other LodGroupNodes.
Creating LOD in code
Creating a new LodGroupNode in code is simple:
var lodGroupNode = new LodGroupNode();
lodGroupNode.Levels.Add(0, meshNode0);  // Maximal details (LOD0)
lodGroupNode.Levels.Add(3, meshNode1);  // Medium details (LOD1)
lodGroupNode.Levels.Add(8, meshNode2);  // Minimum details (LOD2)
lodGroupNode.MaxDistance = 20;          // Optional: Maximum draw distance
The LODs are automatically sorted by distance - they can be added or removed in any order.
Importing LOD using content pipeline
The content pipeline supports models with LOD. See Level of Detail
LOD settings
LOD settings are stored in the CameraNode and the RenderContext.
LOD camera
LOD selection depends on the camera field of view and the distance of an object from the camera. The property RenderContextLodCameraNode defines the camera that is used as a reference for all LOD calculations. The properties CameraNode and LodCameraNode usually reference the same camera instance. LOD calculations will fail if the LodCameraNode is not set.
Note that RenderContextCameraNode and RenderContextLodCameraNode are two different properties. The currently active camera is not necessarily the same camera that is used in LOD computations. This distinction is, for example, important when rendering shadow maps.
LOD bias
The LOD bias is an additional factor that can be set globally (see RenderContextLodBias) or per camera (see CameraNodeLodBias). These factors are multiplied to the LOD distance of a scene node. They can be used to increase or decrease the level of detail based on scene, performance, platform, quality settings or other criteria.
The default LOD bias is 1. A factor of 0 forces all objects to be rendered with the highest level of detail. A large factor, such as ∞, forces all objects to be drawn with the lowest level of detail.
Example uses:
- The LOD bias can be increased during computationally intensive scenes (e.g. large number of objects or characters on screen) to improve performance.
- During cut-scenes the LOD bias can be decreased to improve quality.
- The LOD bias of fast moving cameras or secondary cameras can be increased.
- The LOD bias can be increased or decreased based on the game's quality settings.
- Different LOD biases can be used for different platforms (e.g. PC vs. mobile platforms).
- The LOD bias can also be used to account for different screen resolutions. This can be necessary because the chosen LOD metric is independent of the resolution.
LOD hysteresis
The LOD hysteresis adds a hysteresis to LOD switches (see RenderContextLodHysteresis). Instead of switching between LODs at a certain threshold distance, the distance for switching to the lower LOD is further away than the threshold distance and the distance for switching to the higher LOD is closer. This is a common technique used to reduce LOD popping.
Example: The LOD distance for LOD2 is 100. With an LOD hysteresis of 10, the object transitions from LOD1 to LOD2 at distance 105, and from LOD2 to LOD1 at distance 95.
The Scene itself is agnostic about LodGroupNodes – it does not distinguish between different types of scene and therefore does not automatically evaluate LOD. The LodGroupNodes need to be handled in the scene queries (interface ISceneQuery). The important steps that need to be performed in the scene query are:
Distance calculation: The first step is to compute the view-normalized distance of a scene node.
C#// Calculate view-normalized distance of scene node. float distance = GraphicsHelper.GetViewNormalizedDistance(node, cameraNode); // Apply LOD bias. (The LOD bias is a factor that can be used to increase // or decrease the viewing distance.) distance *= cameraNode.LodBias * context.LodBias;
Distance culling (MaxDistance): The distance can then be used for distance culling.
C#// Distance Culling: Check whether scene node is within MaxDistance. if (Numeric.IsPositiveFinite(node.MaxDistance) && distance >= node.MaxDistance) ... ignore scene node ...
LOD selection:
Then, if the current node is a LodGroupNode, the current LOD can be selected.
C#var lodGroupNode = node as LodGroupNode; if (lodGroupNode != null) { // Evaluate LOD group. var lodSelection = lodGroupNode.SelectLod(context, distance); ... add lodSelection.Current to scene nodes ... }
See ISceneQuery for full example code of scene query that supports LOD.
LOD and LOD blending are explained in detail in the LodBlendingSample (see Samples).
LOD blending
LOD blending can be used to create smooth transitions between LODs. Instant LOD switches can result in apparent "popping" of the geometry in the scene. The property RenderContextLodBlendingEnabled can be set to enable smooth transitions: The renderer draws both LODs and blends them using screen-door transparency (stipple patterns). The length of the transition phase is determined by the LodHysteresis.
Here is a video comparing instant switches and LOD blending:
Only models that support screen-door transparency can be blended at runtime. See Screen-Door Transparency for more information.
If LOD blending should be used, it must be implemented in the scene query where LOD is handled. It involves following steps:
If the scene node is close to the max draw distance, we can fade out the model.
// Fade out scene node near MaxDistance to avoid popping.
if (context.LodBlendingEnabled && node.SupportsInstanceAlpha())
{
  float d = node.MaxDistance - distance;
  float alpha = (d < context.LodHysteresis) ? d / context.LodHysteresis : 1;
  node.SetInstanceAlpha(alpha);
}
SupportsInstanceAlpha and SetInstanceAlpha are two helper methods for setting the effect parameter for screen-door transparency.
After the LOD selection, we can use the information of the LodSelection to find out the current LOD and whether the model is currently transitioning between levels. Based on this information we can blend between LODs.
// ----- Evaluate LOD group.
var lodSelection = lodGroupNode.SelectLod(context, distance);
if (lodSelection.Next != null
    && context.LodBlendingEnabled
    && lodSelection.Current.SupportsInstanceAlpha()
    && lodSelection.Next.SupportsInstanceAlpha())
{
  // The LOD model is currently transitioning between two LODs.
  ... add lodSelection.Current to query results ...
  lodSelection.Current.SetInstanceAlpha(-(1 - lodSelection.Transition));

  ... add lodSelection.Next to query results ...
  lodSelection.Next.SetInstanceAlpha(lodSelection.Transition);
}
else
{
  // No blending between two LODs. Just show current LOD.
  if (lodSelection.Current.SupportsInstanceAlpha())
    lodSelection.Current.SetInstanceAlpha(1);

  ... add lodSelection.Current to query results ...
}
Note that the current LOD is drawn with a negative alpha and the next LOD is drawn with a positive alpha. The pixel shader checks the sign and automatically inverts one of the stipple patterns.
LOD and LOD blending are explained in detail in the LodBlendingSample (see Samples).
LOD blending can be expensive: The workload increases during transitions. Two models need to be rendered instead of one. Therefore, LOD blending should be disable during graphically intensive scenes. Chances are that LOD popping is not noticed anyway. The LOD transition phase should be kept short. (The length of the LOD transition is determined by the property RenderContextLodHysteresis). |