| Step 16: GUI |
In this step we will add a graphical user interface (GUI) to the game.
-
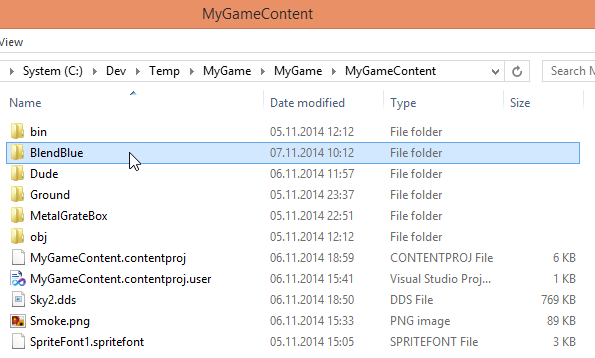
Open the Windows File Explorer and browse to
- <DigitalRune Engine Folder>\Samples\Content\UI Themes\
-
Copy the folder BlendBlue to MyGame\MyGame\MyGameContent.
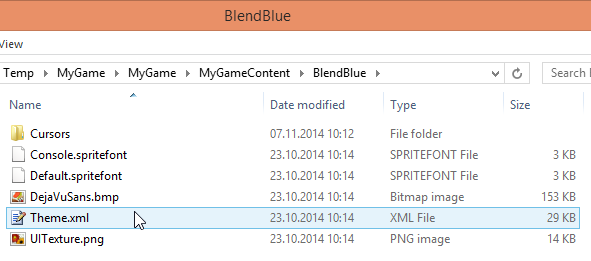
The folder BlendBlue contains the UI theme, which consists of
- mouse cursor file,
- sprite fonts,
- textures and
- a XML file Theme.xml which defines the UI theme.
- In VS Solution Explorer select MyGameContent.
- Click the Show All Files button.
-
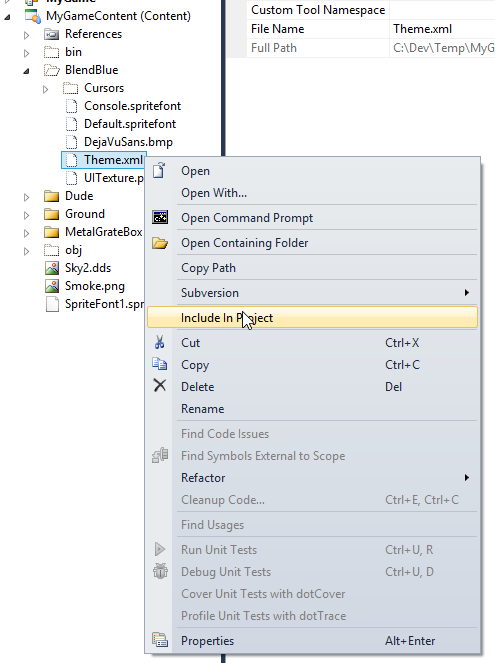
Find the Theme.xml, right-click Theme.xml
and select Include In Project.
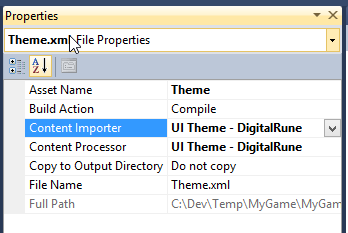
- Press F4 to show the Properties window.
-
Set the Content Importer and the Content Processor to
UI Theme - DigitalRune.
The GUI is handled by the DigitalRune.Game.UI.UIManager:
…
using DigitalRune.Game.UI;                                                  // NEW
…

namespace MyGame
{
    public class Game1 : Microsoft.Xna.Framework.Game
    {
        private GraphicsDeviceManager _graphicsDeviceManager;

        private ServiceContainer _services;
        private InputManager _inputManager;
        private GraphicsManager _graphicsManager;
        private GameObjectManager _gameObjectManager;
        private AnimationManager _animationManager;
        private Simulation _simulation;
        private ParticleSystemManager _particleSystemManager;
        private UIManager _uiManager;                                       // NEW

        …

        protected override void Initialize()
        {
            …
            _particleSystemManager = new ParticleSystemManager();
            _services.Register(typeof(IParticleSystemService), null, _particleSystemManager);

            _uiManager = new UIManager(this, _inputManager);                // NEW
            _services.Register(typeof(IUIService), null, _uiManager);       // NEW

            Components.Add(new MyGameComponent(this));

            base.Initialize();
        }

        protected override void Update(GameTime gameTime)
        {
            _inputManager.Update(gameTime.ElapsedGameTime);

            base.Update(gameTime);

            _uiManager.Update(gameTime.ElapsedGameTime);                    // NEW

            _gameObjectManager.Update(gameTime.ElapsedGameTime);

            _simulation.Update(gameTime.ElapsedGameTime);

            _particleSystemManager.Update(gameTime.ElapsedGameTime);

            _animationManager.Update(gameTime.ElapsedGameTime);
            _animationManager.ApplyAnimations();
        }
        …
The UI service manages UIScreens and UIControls (e.g. buttons and windows). UIManager.Update updates the GUI layout and let's the controls handle user input. UIManager.Update does not draw anything.
The update logic is similar to other game logic tasks. In the DigitalRune Engine the UI controls are just another form of game objects, i.e. the class UIControl derives from GameObject. Since the GUI is usually visible "above" the 3D scene, the UI controls are updated before the game objects.
As mentioned above, UIManager.Update does not render the GUI. Rendering is done in graphics screens. We could add the GUI rendering to MyGraphicsScreen - but we can also create a new graphics screen to separate the 3D rendering from the 2D GUI. Let's create a new class GuiGraphicsScreen.cs:
using System;
using DigitalRune;
using DigitalRune.Game.UI;
using DigitalRune.Game.UI.Controls;
using DigitalRune.Graphics;
using Microsoft.Practices.ServiceLocation;
using Microsoft.Xna.Framework;
using DigitalRune.Game.UI.Rendering;

namespace MyGame
{
    public class GuiGraphicsScreen : GraphicsScreen
    {
        public UIScreen UIScreen { get; private set; }

        public GuiGraphicsScreen(IGraphicsService graphicsService)
            : base(graphicsService)
        {
            var uiService = ServiceLocator.Current.GetInstance<IUIService>();
            var game = ServiceLocator.Current.GetInstance<Game>();

            var theme = game.Content.Load<Theme>("BlendBlue/Theme");
            var renderer = new UIRenderer(GraphicsService.GraphicsDevice, theme);
            UIScreen = new UIScreen("Default", renderer)
            {
                Background = Color.Transparent,
            };
            uiService.Screens.Add(UIScreen);
        }

        public void Dispose()
        {
            UIScreen.UIService.Screens.Remove(UIScreen);
            UIScreen.Renderer.SafeDispose();
        }

        protected override void OnUpdate(TimeSpan deltaTime)
        {
        }

        protected override void OnRender(RenderContext context)
        {
            UIScreen.Draw(context.DeltaTime);
        }
    }
}
The constructor loads the UI Theme, which describes all relevant mouse cursors, sprite fonts and textures. Then a UIRenderer is created, which can render the UI controls using the UI theme information. The GuiGraphicsScreen owns a UIScreen, which is a UI control that covers the whole screen. It is the root element of the GUI. Other controls (e.g. windows) can be added to the UIScreen. The Background of the UIScreen is set to transparent, otherwise the GUI would hide any graphics behind it (i.e. the 3D scene).
The UIScreen renders itself to the back buffer in OnRender.
All changes made in the the constructor are undone in GuiGraphicsScreen.Dispose. In simple projects, like this tutorial, we are often lazy and skip this part. However, once you have more practice you should make it a habit to clean up all actions. For example:
- Call Dispose for all objects which implement IDisposable.
- Remove UIScreens from the IUIService.
- Remove GraphicsScreens from the IGraphicsService.
- Remove GameObjects from the IGameObjectService.
- Remove SceneNodes from the Scene.
- etc.
Let's add a new file MenuWindow.cs to the project:
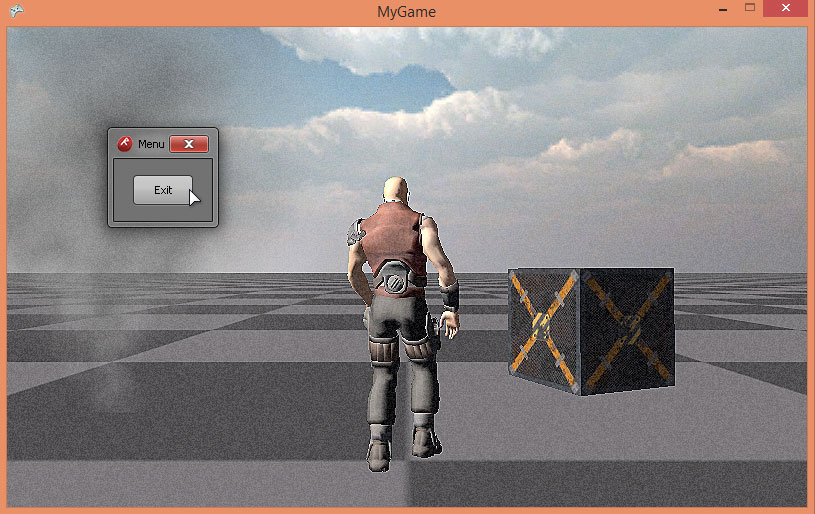
using DigitalRune.Game.UI;
using DigitalRune.Game.UI.Controls;
using Microsoft.Practices.ServiceLocation;
using Microsoft.Xna.Framework;

namespace MyGame
{
    public class MenuWindow : Window
    {
        public MenuWindow()
        {
            Title = "Menu";
            X = 100;
            Y = 100;

            var button = new Button
            {
                Content = new TextBlock { Text = "Exit" },
                Width = 60,
                Height = 30,
                HorizontalAlignment = HorizontalAlignment.Center,
                VerticalAlignment = VerticalAlignment.Center,
            };
            button.Click += (s, e) =>
            {
                var game = ServiceLocator.Current.GetInstance<Game>();
                game.Exit();
            };

            Content = button;
        }
    }
}
This class defines a GUI Window. The Content of the window is a single Button. When the button is pressed, the game exits.
We create an instance of the GuiGraphicsScreen and the MenuWindow in MyGameComponent:
…
namespace MyGame
{
    public class MyGameComponent : Microsoft.Xna.Framework.GameComponent
    {
        …
        private MenuWindow _menuWindow;                                                     // NEW

        public MyGameComponent(Game game)
            : base(game)
        {
            _inputService = ServiceLocator.Current.GetInstance<IInputService>();

            _graphicsService = ServiceLocator.Current.GetInstance<IGraphicsService>();

            _myGraphicsScreen = new MyGraphicsScreen(_graphicsService);
            _graphicsService.Screens.Add(_myGraphicsScreen);
            ((ServiceContainer)ServiceLocator.Current).Register(typeof(IScene), null, _myGraphicsScreen.Scene);

            var guiGraphicsScreen = new GuiGraphicsScreen(_graphicsService);                // NEW
            _graphicsService.Screens.Add(guiGraphicsScreen);                                // NEW

            var gameObjectService = ServiceLocator.Current.GetInstance<IGameObjectService>();
            var cameraObject = new CameraObject();
            _myGraphicsScreen.CameraNode = cameraObject.CameraNode;
            gameObjectService.Objects.Add(cameraObject);

            gameObjectService.Objects.Add(new GroundObject());
            gameObjectService.Objects.Add(new LightsObject());
            gameObjectService.Objects.Add(new DudeObject());
            gameObjectService.Objects.Add(new CrateObject());
            gameObjectService.Objects.Add(new SmokeObject());
            gameObjectService.Objects.Add(new SkyObject());

            _menuWindow = new MenuWindow();                                                 // NEW
            _menuWindow.Show(guiGraphicsScreen.UIScreen);                                   // NEW

            _myGraphicsScreen.DebugRenderer.DrawText("MyGame");
            _myGraphicsScreen.DebugRenderer.DrawAxes(Pose.Identity, 1, false);
        }

        public override void Update(GameTime gameTime)
        {
            //if (_inputService.IsDown(Keys.Escape))                                        // REMOVE
            //  Game.Exit();                                                                // REMOVE

            _menuWindow.IsVisible = _inputService.IsDown(Keys.LeftControl);                 // NEW
            _inputService.EnableMouseCentering = !_menuWindow.IsVisible && Game.IsActive;   // NEW
            Game.IsMouseVisible = _menuWindow.IsVisible;                                    // NEW

            var debugRenderer = _myGraphicsScreen.DebugRenderer;
            debugRenderer.Clear();
            …
        }
    }
}
The game component creates an instance of the GuiGraphicsScreen and adds it to the graphics service. The graphics service can manage several graphics screen. The order in the IGraphicsService.Screens collection defines the draw order: The 3D scene (MyGraphicsScreen) is rendered before the GUI (GuiGraphicsScreens).
Then a MenuWindow is created and displayed in the UIScreen of the GuiGraphicsScreen. In OnUpdate the visibility of the window and the mouse cursor are controlled. The window is only visible when the left CONTROL key is pressed. We also have to disable mouse centering.
To quit the game you now have to hold the left CONTROL key and click the exit button – or simply press ALT + F4.
Previously, mouse centering was controlled by the CameraObject. Let's change this:
…
namespace MyGame
{
    public class CameraObject : GameObject
    {
        //private Game _game;                                                             // REMOVE
        private IInputService _inputService;
        private float _currentYaw;
        private float _currentPitch;

        public CameraNode CameraNode { get; private set; }

        public CameraObject()
        {
            //_game = ServiceLocator.Current.GetInstance<Game>();                         // REMOVE
            _inputService = ServiceLocator.Current.GetInstance<IInputService>();

            var graphicsService = ServiceLocator.Current.GetInstance<IGraphicsService>();
            var projection = new PerspectiveProjection();
            projection.SetFieldOfView(
                ConstantsF.PiOver4,
                    graphicsService.GraphicsDevice.Viewport.AspectRatio,
                    0.1f,
                    100);
            var camera = new Camera(projection);
            CameraNode = new CameraNode(camera);
            CameraNode.PoseWorld = new Pose(new Vector3F(0, 1, 3));
        }

        protected override void OnUpdate(TimeSpan deltaTime)
        {
            //_inputService.EnableMouseCentering = _game.IsActive;                        // REMOVE
            if (!_inputService.EnableMouseCentering)                                      // NEW
                return;                                                                   // NEW

            float deltaTimeF = (float)deltaTime.TotalSeconds;

            Vector2F mousePositionDelta = _inputService.MousePositionDelta;
            …
        }
    }
}
Now the camera does not move when the GUI is visible.
This is the result when the CTRL key is pressed: