| Step 17: Deferred lighting |
In this last step we will add a completely new render pipeline.
Here is a ZIP file with the final result of this tutorial:
The render pipeline is implemented in MyGraphicsScreen and currently looks like this:
…
namespace MyGame
{
    public class MyGraphicsScreen : GraphicsScreen
    {
        …

        protected override void OnRender(RenderContext context)
        {
            …
            // Frustum Culling: Get all the scene nodes that intersect the camera frustum.
            var query = Scene.Query<CameraFrustumQuery>(context.CameraNode, context);

            // Render opaque meshes that are visible from the camera
            graphicsDevice.DepthStencilState = DepthStencilState.Default;
            graphicsDevice.RasterizerState = RasterizerState.CullCounterClockwise;
            graphicsDevice.BlendState = BlendState.Opaque;
            graphicsDevice.SamplerStates[0] = SamplerState.AnisotropicWrap;
            context.RenderPass = "Default";
            _meshRenderer.Render(query.SceneNodes, context);
            context.RenderPass = null;

            _skyRenderer.Render(query.SceneNodes, context);

            graphicsDevice.DepthStencilState = DepthStencilState.DepthRead;
            _billboardRenderer.Render(query.SceneNodes, context, RenderOrder.BackToFront);

            context.SourceTexture = intermediateRenderTarget;
            context.RenderTarget = screenRenderTarget;
            context.Viewport = screenViewport;
            _postProcessors.Process(context);
            context.SourceTexture = null;

            DebugRenderer.Render(context);
            …
        }
    }
}
The important steps are
- Get the scene nodes that are visible from the camera (= frustum culling).
- Render opaque meshes using the render pass "Default".
- Render sky.
- Render billboards and particles.
- Run post-process flters.
- Render debug graphics.
Such a render pipeline can be useful for less powerful hardware (e.g. mobile devices). But several advanced features are lacking:
- High dynamic range (HDR) rendering
- Better materials (e.g. normal mapping)
- Rendering shadows, reflections, lens flares
- Screen space ambient occlusion
- etc.
Time to look at a more complex render pipeline.
Let's drop a new graphics screen into the project. This graphics screen was taken from the DigitalRune samples and I have made only minor modifications. I have added following files to the project:
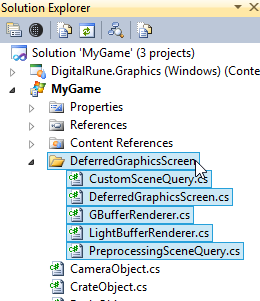
These files are included in the final ZIP file of this tutorial (see link above).
The new render pipeline is implemented in DeferredGraphicsScreen. To use it we make these changes to MyGameComponent:
…
namespace MyGame
{
    public class MyGameComponent : Microsoft.Xna.Framework.GameComponent
    {
        private IInputService _inputService;
        private IGraphicsService _graphicsService;
        //private MyGraphicsScreen _myGraphicsScreen;                                     // Comment out
        private DeferredGraphicsScreen _myGraphicsScreen;                                 // New
        private MenuWindow _menuWindow;

        public MyGameComponent(Game game)
            : base(game)
        {
            _inputService = ServiceLocator.Current.GetInstance<IInputService>();

            _graphicsService = ServiceLocator.Current.GetInstance<IGraphicsService>();

            //_myGraphicsScreen = new MyGraphicsScreen(_graphicsService);                 // Comment out
            _myGraphicsScreen = new DeferredGraphicsScreen(ServiceLocator.Current);       // New
            _graphicsService.Screens.Add(_myGraphicsScreen);
            ((ServiceContainer)ServiceLocator.Current).Register(typeof(IScene), null, _myGraphicsScreen.Scene);
            …
        }
        …
When you run the game, you can see that the models are not rendered.
Sidenote: Normally, if models are not rendered, the first thing I do is to enable the debug rendering to check bounding boxes, model skeletons, etc. |
The reason that the models are not rendered is that they need different effects. For example, the currrent material of the ground model ( ground.drmat) is:
<?xml version="1.0" encoding="utf-8"?>
<Material>
    <Pass Name="Default" Effect="BasicEffect" Profile="Any">
        <Parameter Name="Alpha" Value="1" />
        <Parameter Name="DiffuseColor" Value="0.8,0.8,0.8" />
        <Parameter Name="EmissiveColor" Value="0,0,0" />
        <Parameter Name="SpecularColor" Value="0,0,0" />
        <Parameter Name="SpecularPower" Value="16" />
        <Parameter Name="VertexColorEnabled" Value="False" />
        <Texture Name="Texture" File="ground.png" />
    </Pass>
</Material>
There is one render pass that uses the BasicEffect of XNA. This effect is used when MyGraphicsScreen renders the meshes with:
context.RenderPass = "Default";
_meshRenderer.Render(query.SceneNodes, context);
The BasicEffect transforms the meshes and computes the shading in one pass – this kind of rendering is called forward rendering.
If you look into the DeferredGraphicsScreen classes you will not find a use of the render pass "Default". Several other render passes are used instead, for example:
context.RenderPass = "ShadowMap";
ShadowMapRenderer.Render(sceneQuery.Lights, context);
…
context.RenderPass = "GBuffer";
graphicsDevice.DepthStencilState = DepthStencilState.Default;
graphicsDevice.RasterizerState = RasterizerState.CullCounterClockwise;
graphicsDevice.BlendState = BlendState.Opaque;
_sceneNodeRenderer.Render(sceneNodes, context);
…
context.RenderPass = "Material";
MeshRenderer.Render(sceneQuery.RenderableNodes, context);
The graphics screen renders shadow maps for shadows. Deferred lighting transforms the meshes in the "GBuffer" pass. The transformed geometry is stored in a render target called the G-buffer. The shading happens in a separate "Material" pass. If these render passes are not present in the DRMAT file, then the meshes are not rendered in the corresponding render passes. We have to update the materials of the models. Here is the new material of the ground model (ground.drmat):
<?xml version="1.0" encoding="utf-8"?>
<Material>
    <Pass Name="Default" Effect="BasicEffect" Profile="Any">
        …
    </Pass>
    <Pass Name="ShadowMap" Effect="DigitalRune/Materials/ShadowMap" Profile="HiDef" />
    <Pass Name="GBuffer" Effect="DigitalRune/Materials/GBuffer" Profile="HiDef">
        <Parameter Name="SpecularPower" Value="10" />
    </Pass>
    <Pass Name="Material" Effect="DigitalRune/Materials/Material" Profile="HiDef">
        <Parameter Name="DiffuseColor" Value="1,1,1" />
        <Parameter Name="SpecularColor" Value="0.1,0.1,0.1" />
        <Texture Name="DiffuseTexture" File="ground.png" />
    </Pass>
</Material>
The referenced effects are pre-built effects of DigitalRune Graphics – however, you could also use your own effects.
The materials of all models need to be updated. The correct materials can be found in the final ZIP file of this tutorial.
One more thing to note is: The animated model needs to use different effects that support mesh skinning:
<?xml version="1.0" encoding="utf-8"?>
<Material>
    <Pass Name="Default" Effect="SkinnedEffect" Profile="Any">
        …
    </Pass>
    <Pass Name="ShadowMap" Effect="DigitalRune/Materials/ShadowMapSkinned" Profile="HiDef" />
    <Pass Name="GBuffer" Effect="DigitalRune/Materials/GBufferNormalSkinned" Profile="HiDef">
        …
    </Pass>
    <Pass Name="Material" Effect="DigitalRune/Materials/MaterialSkinned" Profile="HiDef">
        …
    </Pass>
</Material>
Once the materials are updated, you should see the final result of this tutorial:
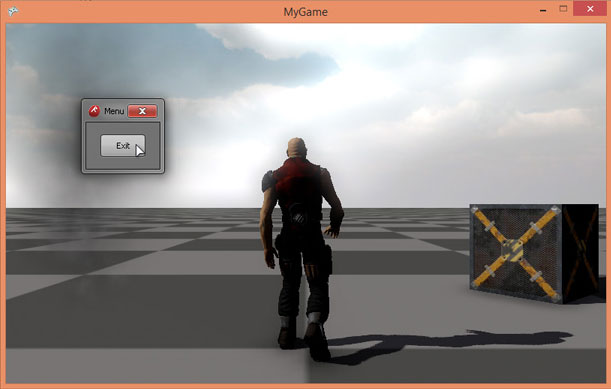
For more information, about the deferred rendering please check out the source code of the DigitalRune samples.