| Step 9: Animated Model |
In this step we will enable playback of animations.
Let's add the animation service to Game1.cs:
…
using DigitalRune.Animation;                                                          // NEW
…

namespace MyGame
{
    public class Game1 : Microsoft.Xna.Framework.Game
    {
        …
        private AnimationManager _animationManager;                                   // NEW
        …

        protected override void Initialize()
        {
            …
            _gameObjectManager = new GameObjectManager();
            _services.Register(typeof(IGameObjectService), null, _gameObjectManager);

            _animationManager = new AnimationManager();                               // NEW
            _services.Register(typeof(IAnimationService), null, _animationManager);   // NEW

            Components.Add(new MyGameComponent(this));

            base.Initialize();
        }

        protected override void Update(GameTime gameTime)
        {
            _inputManager.Update(gameTime.ElapsedGameTime);

            base.Update(gameTime);

            _gameObjectManager.Update(gameTime.ElapsedGameTime);

            _animationManager.Update(gameTime.ElapsedGameTime);                       // NEW
            _animationManager.ApplyAnimations();                                      // NEW
        }
        …
The animation service is similar to the other service – only the update consists of two parts. AnimationManager.Update computes the animations but it does not change the animated objects. AnimationManager.ApplyAnimations applies the changes to the animated objects. This separation is only relevant for multithreaded game loops. For beginners it is best to call these methods in immediate succession, as shown above.
Next, we create a new game object DudeObject.cs, which loads the Dude model:
using System;
using System.Linq;
using DigitalRune.Animation;
using DigitalRune.Animation.Character;
using DigitalRune.Game;
using DigitalRune.Graphics.SceneGraph;
using Microsoft.Practices.ServiceLocation;
using Microsoft.Xna.Framework;

namespace MyGame
{
    public class DudeObject : GameObject
    {
        private ModelNode _modelNode;
        private AnimationController _animationController;

        protected override void OnLoad()
        {
            var game = ServiceLocator.Current.GetInstance<Game>();
            var scene = ServiceLocator.Current.GetInstance<IScene>();

            _modelNode = game.Content.Load<ModelNode>("Dude/Dude").Clone();
            scene.Children.Add(_modelNode);

            // Create looping animation.
            var meshNode = (MeshNode)_modelNode.Children[0];   // The dude model has a single mesh node as its child.
            var animations = meshNode.Mesh.Animations;
            var animationClip = new AnimationClip<SkeletonPose>(animations.Values.First())
            {
                LoopBehavior = LoopBehavior.Cycle,  // Repeat animation…
                Duration = TimeSpan.MaxValue,       // …forever.
            };

            // Start animation.
            var animationService = ServiceLocator.Current.GetInstance<IAnimationService>();
            _animationController = animationService.StartAnimation(animationClip, (IAnimatableProperty)meshNode.SkeletonPose);
        }


        protected override void OnUnload()
        {
            _animationController.Stop();
            _animationController.Recycle();

            _modelNode.Parent.Children.Remove(_modelNode);
            _modelNode.Dispose(false);
            _modelNode = null;
        }
    }
}
This game object loads the model, clones it and adds it to the scene. A model consists of a ModelNode, which has one or more child nodes. Child nodes can be of type MeshNode, LightNode, etc. Most models, such as the Dude.fbx, contain a single MeshNode.
Next, we need to get the animations of the model. Animations are always stored per mesh. We get the first animation of the mesh, which in this case is a walk animation. To loop the animation we need to create an AnimationClip.
Then the animation is started using the animation service. The animation is applied to the SkeletonPose of the MeshNode.
From now on the animation service will play the walk cycle forever – or until we stop it manually. IAnimationService.StartAnimation returns an AnimationController, which we can use to stop the animation.
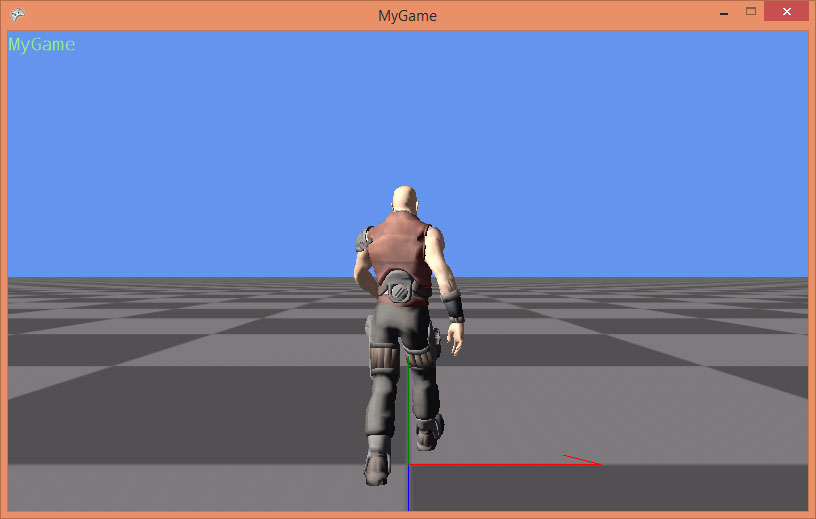
If we run the game, the dude model is shown, but it is huge and not animated. Let's fix this.
If you open the Windows File Explorer browse to the folder of the Dude model, you should see a few new files with the file extensions drmdl and drmat.
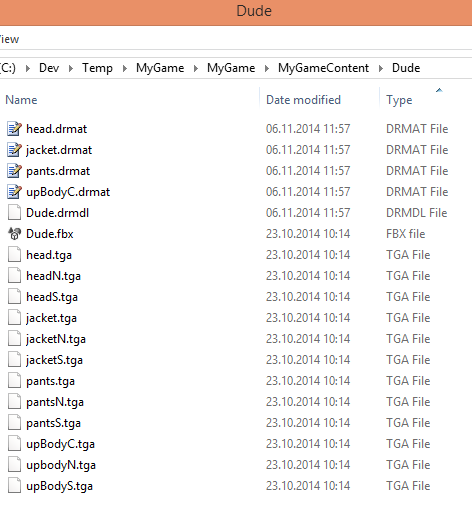
These files were automatically created when the XNA content pipeline processed Dude.fbx.
(For some models these files are not created automatically. In this case you have to create them manually. Copy an existing *.drmdl and *.drmat file from the DigitalRune samples and use them as a starting point.)
To change the scale of the Dude model, open the Dude.drmdl file in a text editor and change the <Model> tag:
…
<Model File="Dude.fbx"
       GenerateTangentFrames="True"
       PremultiplyVertexColors="True"
       RotationX="0" RotationY="0" RotationZ="0"
       Scale="0.02"
       SwapWindingOrder="False"
       AabbMinimum="-1,-0.2,-1"
       AabbMaximum="1,2,1">
…
We set the Scale to 0.02. Also set GenerateTangentFrames to true – we do not need this right now, but in the future we will when we start to use normal mapping and advanced graphics.
We also define the axis aligned bounding box (AABB) of the model using AabbMinimum and AabbMaximum. Normally, the bounding box is computed automatically for models. However, the bounding box is always computed for the rest pose (unanimated pose) of the model. When the model is animated some limbs can be moved outside the this box. Therefore, we have to manually set a bigger box manually, which is large enough to contain all animated poses of the model.
Next, open all *.drmat files in a text editor and change the effect of the default render pass from BasicEffect to SkinnedEffect.
…
<Pass Name="Default" Effect="SkinnedEffect" Profile="Any">
…
The XNA BasicEffect cannot render animated models (a.k.a. skinned meshes). The XNA SkinnedEffect can.
Make these changes and run the game again. The Dude should be walking: